


Beyond the Stick Figure is an online art program that can be used by children and adults. This course should work especially well for students who are serious about art and willing to work patiently through each step. It does require a certain amount of fine motor control for drawing that students younger than age seven or eight might not have acquired. The course is not likely to work for students who just want to create showy art pieces but are not really interested in developing skills.
Beyond the Stick Figure was created by Sally Stansfield, a professional artist with an art degree who is also a homeschooling mother of eight. She teaches drawing skills as well as how to work with different media: pen and ink, watercolors, acrylics, and clay. The content is divided into sections for each medium. Some drawing skills are taught first, followed by extensive work with black markers (pen-and-ink work) and watercolors plus introductory work with acrylics and clay. The projects for each medium progress from simple to more complex.
The course is designed to teach students foundational art skills used by professional artists. It does this incrementally with brief video instruction (over 170 short video sessions), sometimes accompanied by PDFs with templates for the activities.
Most projects are done on a small scale to keep them manageable, but they still take more than a day to complete. For each project, the lessons are divided into sessions that are labeled Day 1, Day 2, etc., but the time required for each day's activity varies greatly. You will find that you can sometimes complete more than one of these sessions in a day, but a single session of another lesson might stress the limits of your student's attention span. Many video segments run five minutes or less, but students might need to work anywhere from a few minutes to an hour on the project, depending upon their age and ability. Students can work right along with the video, pausing as needed, or do their work after watching. You can spread these lessons out over a school year, but some students might want to work through them more quickly.
Stansfield mentions the materials needed at the beginning of each section of the course where different media are introduced, but don’t miss the “Materials” tab on the main page before you actually start into the course. Here is where you will find a comprehensive list of the resources. You will need supplies such as a ream of standard white copier paper, cardboard, masking tape, drawing pencils, a fine-point Sharpie™, a set of Prismacolor™ markers (primary and secondary colors), a sketch pad, a watercolor pad, assorted paint brushes, tubes of watercolor and acrylic paints, masking fluid, polymer clay, and air-dry clay.
The videos look like they were created on a low budget. But production values aside, Stansfield is an excellent teacher, and students can clearly hear and see what she is doing. Stansfield talks students through as she demonstrates each step. There is an attention to detail in this course that is not present in many other drawing courses. Beyond the Stick Figure is challenging in that it requires students to work carefully step by step and wait patiently to see the final outcome.
There is a two-week free trial period. After that, courses are accessed with a monthly subscription, and that subscription gives you access to a few other courses Stansfield has available.
I will describe the sections of the course in the order they are presented.
Drawing
For the drawing section of the course, Stansfield begins by explaining the resources you will need and stressing the importance of using good quality materials. Then she has you cut some of the copy paper into quarter pages so that students will start on a small scale as they learn drawing techniques.
The drawing lessons are designed to help students develop controlled skill with pencils and markers. Students begin at a very basic level drawing circles, straight lines, dots, and curved lines. Stansfield has students practice drawing various versions of each form on their small paper, sort of like an artistic doodle. They can draw with a marker and color their drawings with other color markers if they wish.
Next, students use templates printed from the PDF files to work on drawing more complex lines and shapes. They might begin with a pencil using dots on the pre-printed page as guides. Templates are divided into 16 boxes, and students will practice drawing identical images in each box. When they get their lines correct, they can go over them with a fine Sharpie. After practicing each step, they tackle each drawing without any guiding dots. They can color in with their markers at the end of each drawing exercise.
There are 16 of these exercises. After they are done, Stansfield has students copy one box from each exercise onto a single page, combining all of the small images to make one complex drawing. This is sort of like solving a puzzle. The 16 exercises get a little tedious since students don’t know that the pieces will come together for a surprising end result. However, the drawings are small and shouldn’t take that long to complete.
Pen and Ink
For pen and ink lessons, students will need a fine-point Sharpie, a pencil, a paintbrush, watercolor paper, tracing paper, masking tape, and a kneaded eraser. (Stansfield calls it a putty eraser.)
Pen and ink lessons also include some work with watercolors. Students spend three sessions on a mini-project, creating tiny landscapes with pen and one color of the watercolor paint on small squares of watercolor paper. (This can easily be completed in one day even though there are three days allotted.)
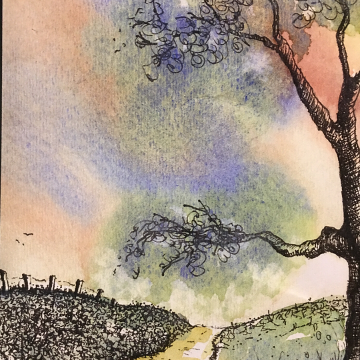
Drawing skills come into play even more as students work on a landscape project. Students copy a provided image of a tree onto watercolor paper then use a Sharpie to add details to the tree and the surrounding landscape. After the ink drawing is complete, students learn more about watercolors as they paint with yellow and blue, creating a range of colors that includes shades of green.
Watercolor
The watercolor section begins with a monochromatic landscape created on small rectangles. Students need to create at least eight of these small rectangles because they will be experimenting with new techniques on each of them. They will be painting essentially the same landscape on each rectangle, but they can experiment with different techniques or practice perfecting techniques on each one. They will work in stages through sky, hills, water, and foreground. Students need to be patient enough to let their paintings dry between each lesson.
The first step in the next project gives students a chance to practice the drawing skills learned earlier. On small rectangles, they will draw a copy of the provided image of three overlapping flowers with leaves, creating a set of five identical flower drawings. After that, students copy a larger drawing of the same image.
Students then learn to use masking fluid as a resist (that will not absorb paint) as they paint the small flower drawings, then the large. Students are learning many skills rather than producing lots of artwork. They work with a limited range of paint colors and learn how to create secondary colors by mixing primary colors.
Acrylics
Students continue to work on small-scale projects as they learn techniques for working with acrylic paint. They begin by learning how to create backgrounds, clouds, and simple landscapes with just two colors. In the next project, they use more colors, creating a more complex landscape. While students have to let their paintings dry between steps, these paintings produce very nice results in less time than most of the other projects. Those quick results might make this section of the course the student's favorite. As with the watercolor lessons, Stansfield has students use only primary colors of acrylic paint and mix them rather than use many tubes of paint.
3D Design
Students will work with polymer, oven-bake clay like Sculpey™ to sculpt an animal figure and a coiled pot. Then they learn to work with air-dry clay to make a slab pot. Students need to listen carefully to the slab pot instructions and maybe watch a few of the sessions before they start to make sure they understand what they are doing. The coil pot might seem too tedious for some students, so you might want to skip it. However, some techniques are taught in those lessons that are applied again with the slab pot.
Stansfield encourages students to consider decorating their clay projects with designs or paint, although doing so is optional.