


ibrick is a LEGO® – type construction kit for ages five through twelve with basic blocks, plates, gears, special connectors, tires, a battery-operated motor, and other specially designed pieces for constructing operable projects such as a windmill, a carousel, a helicopter, an off-road jeep, and a forklift. It’s great for learning some of the basics of mechanical engineering. While the ibrick pieces interlock perfectly with LEGO bricks, LEGO does not authorize or endorse ibrick or its website content.
ibrick is available through a subscription model for three, six, or twelve months at a time. Parents also choose the age group for the subscription: ages 5-6, 7-8, or 9-12, although they can change the age group during the subscription period if they wish. Projects become progressively more difficult for each age group. I chose a kit for ages 9-12 for this review.
All subscriptions include the complete ibrick kit plus access to online lessons for the period of your subscription. Consequently, short subscriptions cost much more per month than lengthier ones to cover the cost of the kit. (Discounts are available for additional subscriptions for family members and for subscription renewals.)
A subscription gives the child access to one model-building project per week. Currently, there are more than 200 projects in the entire program, although the age level of the subscription limits projects to those appropriate for that level. New projects are continually being added.
While children can explore and experiment with ibrick on their own, they can’t rush through the projects, and they can’t pick and choose the order in which to do projects unless they contact ibrick and ask for access to a particular project.
How It Works
The kit must be organized before students can start building. They need to watch the “Intro” and “Organizing the Kit” videos before beginning the first project. The animated character I.B. narrates these videos and is one of the characters in the explanatory lesson videos.
The pieces come in several sealed bags, and sorting them into their proper places takes some time. The process also helps familiarize children with the many types of pieces in the kit, so parents shouldn’t organize the kit for them.
Lessons have three main parts: building instructions, an explanatory lesson, and challenge projects.
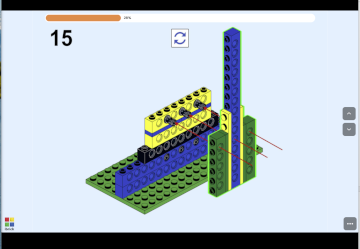 Project instructions, available only online, are accessed with a computer or tablet. The instructions show only one step at a time on slides without narration. Each slide demonstrates exactly which pieces to use and where to place them. Children can go back through the instructions if something seems wrong. 3D instructions show the same building process but add the ability to rotate models in a 3D fashion to see them from a different angle. A brief video demonstrates how the finished project works.
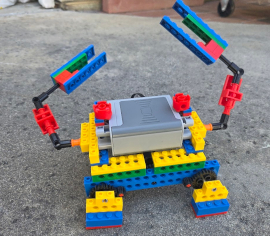 The explanatory lesson, taught by animated characters, explains the mechanical concept. For instance, the first project, a wind turbine, has students build a windmill that runs on electricity rather than an energy-producing machine. Nevertheless, the explanatory lesson video explains how wind turbines work and why they are useful for producing energy. Another video for the crab project (see image to the left), explains the structure of crabs, the powerful mechanics of their claws, their hard shells, and their sideways locomotion. Students can learn a lot through these videos, so parents should make sure they don’t skip over them.
A multi-part challenge activity follows the explanatory video. For example, the challenge for the wind turbine first asks students to build a taller one. Step-by-step instructions follow, showing one way to do this, although students can come up with other ways. A second part of this challenge asks students to build longer blades, explaining why longer blades work better than wider blades. The second challenge might be dependent on following the instructions for accomplishing the first part of the challenge, as it is for the wind turbine, so it’s usually best to follow instructions for at least the first part of a challenge.
The lesson explanations take these projects beyond just the fun of building, teaching real-life mechanical and engineering concepts that apply to things we build as well as to living creatures, as with the crab project. You can include these lessons as part of your science curriculum for physics and technology.
The kit pieces are high quality, and the instructions are easy to follow. If you lose or break a piece, ibrick will replace it for you. The kit includes a tool for separating pieces, although some of the complex pieces can’t be separated with the tool. I used pliers to separate a few.
What Happens after Your Subscription Ends?
When your subscription ends, you still own the kit. You can renew your subscription at a reduced price if you want continued access to projects. Or children can experiment to build their own creations based on what they’ve learned about construction techniques in the lessons they’ve completed. They might want to add bricks from LEGO sets, too.
Why Just One Project Per Week?
I was initially put off by the restrictions on the immediate availability of projects. However, as I worked through several projects, I experienced the progression in difficulty. Also, if children use all lesson components, including all the challenges, that should be plenty for one week. Nevertheless, ibrick is responsive to requests for access to projects out of order and will gladly shift to a higher level if a child needs a greater challenge.
Summary
I think ibrick is excellent, and kids will love it.